- qTest Tutorial
- qTest - Home
- qTest - Introduction
- qTest - Features
- qTest - Free Trial Access
- qTest - Login
- qTest - Dashboard
- qTest - Invite Users
- qTest - Add a Project
- Test Plan & Release Management
- Test Plan & Build Management
- qTest - Modules Management
- qTest - Requirements
- qTest - Create Associated Test Cases
- qTest - Import Requirements
- qTest - Export Requirements
- qTest - Export RTM
- qTest - Test Design
- qTest - Calling a Test Case
- qTest - Approve a Test Case
- qTest - Import Test Cases
- qTest - Export Test Cases
- qTest - Test Cycle Management
- qTest - Test Suite Management
- qTest - Add Test Runs
- qTest - Test Execution
- qTest - Quick Run
- qTest - Submit a Defect
- qTest - Clone a Defect
- qTest - Import a Defect
- qTest - Reports
- qTest - Filter
- qTest - Drag & Drop
- qTest - Hotkeys
- qTest - Recycle Bin
- qTest - Search
- qTest - Toggle ID
- qTest - Tagging ID
- qTest Useful Resources
- qTest - Quick Guide
- qTest - Useful Resources
- qTest - Discussion
qTest - Add a Project
In this chapter, we will understand how to add a project into qTest. To add a project, you should have the Admin rights.
Create a Project
Following are the steps to add a project into qTest.
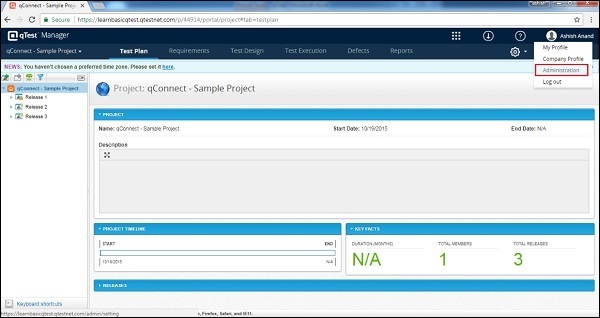
Step 1 − Go to the user profile section and click Administration as shown in the following screenshot.
By default, the Project tab displays the +Add new project button as shown in the following screenshot.

Step 2 − Enter the Project Name, Start and End date, Description and assign users as admin as shown in the following screenshot. Then, click the +Add button at the bottom.

By clicking the +Add button, the project gets added successfully and a dialog box appears along with the OK button as shown in the following screenshot.

Step 3 − Click OK and you will be able to see the newly added project in the table.

Step 4 − You can access this project by clicking the options on the top left corner of the screen and selecting the project name as shown in the following screenshot.

By clicking the Project name, the Test Plan page of the corresponding project is displayed.

To Continue Learning Please Login