- Vim Tutorial
- Vim - Home
- Vim - Introduction
- Vim - Installation & Configuration
- Vim - It’s friends
- Vim - Getting familiar
- Vim - Getting help
- Vim - Editing
- Vim - Navigating
- Vim - Revisiting Editing
- Vim - Searching
- Vim - Working With Multiple Things
- Vim - Markers
- Vim - Macros
- Vim - Registers
- Vim - Folding
- Vim - Diff
- Vim - Plug-ins
- Vim - Using Vim as IDE
- Vim - Remote File Editing
- Vim - Tips & Tricks
- Vim - Personalization
- Vim - Conclusion
- Vim Useful Resources
- Vim - Quick Guide
- Vim - Useful Resources
- Vim - Discussion
Vim - Personalization
We can personalize Vim according to our requirement. In this section, we will discuss following items −
- Configuration files
- Changing fonts
- Changing color scheme
- Personal highlighting
- Status line
Configuration files
For Vim configuration files can be at user level or global level. User specific settings will be stored in user level files while global settings will be stored in global level files.
Vimrc file
Global vimrc
To find out global vimrc file execute following command in editor
:echo $VIM
OR
:echo \%VIM\%
On Linux this file will be located under /usr/share/vim directory while on Window it will be under C:\Program Files\Vim folder
Local vimrc
Local vimrc will be located under user’s home directory. For instance, on Linux it will be under /home/<USER> directory while on Windows it will be under C:\Documents and Setting\<USER>/ folder
Note that, on Windows file name will be _vimrc whereas on Linux it will be .vimrc.
Gvimrc
Global gvimrc
On Linux this file will be located under /usr/share/gvim directory while on Window it will be under C:\Program Files\Vim folder
Local gvimrc
Local gvimrc will be located under user’s home directory. For instance, on Linux it will be under /home/<USER> directory while on Windows it will be under C:\Documents and Setting\<USER>/ folder
Note that, on Windows file name will be _gvimrc whereas on Linux it will be 55 .gvimrc.
exrc
exrc files are used for backward compatibility. These files are ignored if either vimrc or gvimrc file is present.
Global exrc
On Linux this file will be located under /usr/share/vim directory while on Window it will be under C:\Program Files\Vim folder
Local exrc
Local exrc will be located under user’s home directory. For instance, on Linux it will be under /home/<USER> directory while on Windows it will be under C:\Documents and Setting\<USER>/_exrc folder
Changing fonts
To change font execute following command in gVim −
:set guifont = courier
Above command will change font to courier.
Change colorscheme
To change color scheme execute following command −
:colorscheme <tab>
When you press tab character, it will show available color schemes for Vim.
Personal highlighting
Highlight characters after certain columns
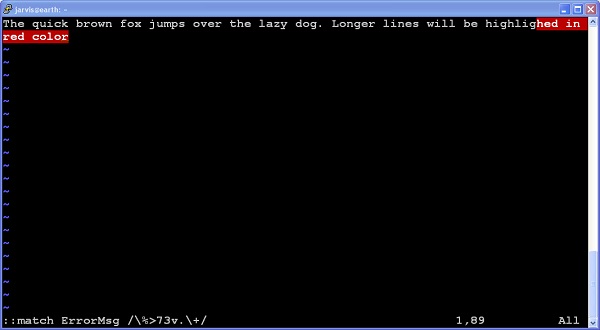
Execute below command to highlight columns greater than 73 −
:match ErrorMsg /\%>73v.\+/
Below image shows this −
Below is description of this command −
| Sr.No | Command & Description |
|---|---|
| 1 | \%>
Match after column |
| 2 | 73
This is column number |
| 3 | V
It should work for virtual columns only |
| 4 | .\+
Match one or more characters |
Add line number
To add line number execute following command −
:set number
To disable this execute following command −
:set nonumber
Set number width
To set number width execute following command −
:set numberwidth = <num>
Spell check
To enable spell check execute following command −
:set spell
And to set spell language execute following command −
:set spelllang = <language>
For example to set German use following comman −
:set spelllang = de
Abbreviation
Using abbreviation we can create shortcuts for long string. For instance below command creates abbreviation namely “quick”.
:abbr quick the quick brown fox
If you type “quick” and press tab then it will be replaced by “the quick brown fox” string
We can use this to correct some typos. For instance below command does this −
:abr teh the
Status line
Status line is shown at the bottom of editor. To enable status line execute following command −
:set laststatus = 2
To remove this for current session execute following command −
:set laststatus = 0
To Continue Learning Please Login